
Environment:
Jmeter 2.12
java version "1.8.0_66"
Windows 7
The example steps below will use the following JSON response data
[
{
"id" : 88
}, {
"id" : 99
}
]
Steps:
- Grab the minimal-json jar from maven central here:
https://mvnrepository.com/artifact/com.eclipsesource.minimal-json/minimal-json/0.9.1
- Put the minimal-json-0.9.1.jar file in your <jemeter_home>/lib folder and restart jmeter
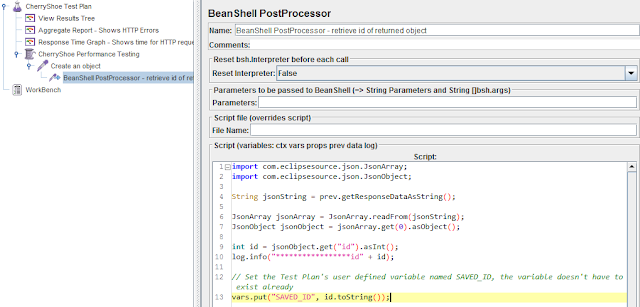
- Use Jmeter's Bean Shell Post Processor to parse the JSON response data:
To retrieve the first id in the JsonArray, put this in the Script section:import com.eclipsesource.json.JsonArray; import com.eclipsesource.json.JsonObject; String jsonString = prev.getResponseDataAsString(); JsonArray jsonArray = JsonArray.readFrom(jsonString); JsonObject jsonObject = jsonArray.get(0).asObject(); int id = jsonObject.get("id").asInt(); log.info("*****************id" + id); // Set the Test Plan's user defined variable named SAVED_ID, the variable doesn't have to exist already vars.put("SAVED_ID", id.toString());
- Now, for subsequent HTTP calls the SAVED_ID will have the value of the object created.
- NOTE: Using an Aggregate Report will show how many successful or failed HTTP calls. Using a Response Time Graph will show response time in a span of the elapsed time.

* http://eclipsesource.com/blogs/2014/06/12/parsing-json-responses-with-jmeter/
* http://eclipsesource.com/blogs/2013/04/18/minimal-json-parser-for-java/
No comments:
Post a Comment
I appreciate your time in leaving a comment!